Tuesday 30 December 2014

There Is Surely A Future Hope For You


During my growing up years, I was always tasked by my late mum to pound dried chillies, shallots,garlic and candlenut whenever she cooks curry. I detested this task so much so that after my job is done, I would not be bothered to stay in the kitchen to watch her cook her delicious curry. It was also not very often the family had chicken curry which was considered as occasion food in my younger days. So I have never learnt to cook nice chicken curry, and there is no family recipe to follow. It is also out of sheer laziness and convenience that I have always cooked chicken curry with store bought rempah.


Today, I'm a little hardworking(I think peeling shallots is hard work ). I cook a pot of Kari Ayam from scratch. I am a happy cook, the Kari Ayam from scratch is so sedap! I don't think I will buy another store bought rempah again, even on my lazy cook days.


Kari Ayam
Travelling-foodies

Ingredients A
1 chicken appro 1.2kg cut into large chunks
2 tbsp curry powder
2 tbsp chili powder
1/2 tsp salt
1 sprig curry leaves

Rempah ingredients

100g shallots or large onions, peeled and sliced
5 cloves of garlic, peeled and sliced
thumb-length knob of giner
1 tbsp curry powder
1 tbsp chili powder


Condiments and others

1 stick of cassia bark (kayu manis)
2 star anise
1 stalk of lemongrass, cut into large chunks, sliced lengthwise and bruised slightly
1/4 cup of cooking oil
2-3 large potatoes, peeled and cut into small chunks
500ml of thick coconut milk
200ml of water
1 tsp salt to taste
1 sprig of curry leaves
1 tbsp sugar, optional
1 chicken bouillon cube, optional
1 tsp ground pepper, to taste, optional


Method


  • Mix all the ingredients A thoroughly, rub each piece of chicken thoroughly with the powders and salt and marinate for at least 1 hour, preferably overnight in the fridge.
  • Blend or pound the peeled shallots or onions, garlic and ginger to form a coarse paste. Set aside the additional curry and chili powder for later use.

  • To a heated wok, add oil followed by blended onion-garlic-ginger paste. Stir fry slowly under medium heat until aromatic, 3-5 minutes.
  • Add bruised lemongrass,cili powder,curry powder, cassia bark stick and star anise and continue to stir fry until all the aroma of the spices and ingredients are very apparent (3-5 mins)

  • Add marinated chicken chunks. Stir fry until the chicken are well coated with the fried ingredients. Continue to stir fry under medium heat for another 10 minutes.

  • Add water as well as half the amount of coconut milk and potatoes. Bring the mixture to a boil before simmering with lid on for 20 min. The chicken cube should be added now if using.
  • Taste and adjust the flavours with more salt. A bit of sugar may be added to balance the flavours while ground pepper can be added for an additional spicy edge.
  • Add remaining thick coconut milk and return to a boil before simmering to medium-low heat for the last 10-15 min or until the chicken and potatoes are soft and thoroughly cooked through. A sprig of curry leaves is added at this point to 'refresh' the aroma of the dish.
  • Serve warm with rice, roti peranchis or roti jala.
Note: I blended the rempah ingredients together with the curry and chili powder. I shallow fry the potatoes before adding into the chicken. All photos taken from my Iphone camera.


Wishing all my readers here a Blessed New Year!  Proverbs 23:18 tells us about God's promises and to face the new year with hope.

There is surely a future hope for you, and your hope will not be cut off. Proverbs 23:18


I was away on holiday in the UK and want to share with you this beautiful light and sound show at Shakespeare's birthplace in Stratford upon Avon.

Friday 28 November 2014

Job Prayed For His Friends


These are muffins which I want to make again and again. The family is not
big on cakes and muffins, but I just love baking them to share with friends and siblings. It makes me happy to see the delightful expression on their faces when they take the first bite. This is then usually devoured in seconds.


I don't bake many kinds of muffins. This is probably my third post on muffins. These Banana Walnut Chocolate Chips Muffins really deserve a place in this blog and I do really hope whoever read this post will bake them.

Bananas are good source of dietary fibre, with plenty of Vitamin B6, potassium and manganese. However, the nutrient content of bananas changes as it becomes more ripen.  It is packed with antioxidants and becomes less starchy with the complex carbohydrates breaking to simple sugars. This change in the carbohydrates makes overripe bananas sweeter. For this reason, diabetics should avoid overripe bananas as it may result a quicker rise in blood sugar.


Bananas, walnut and Chocolate chips are best and popular combination. The taste and flavour are simply best of the classics.  Baking muffins is basic baking. Most beginners start by baking muffins which requires very few equipment and quick baking time. One must remember the golden rule of not over stirring or your muffins will be hard. For this bake, I did not mash the bananas but left it in chunks for better texture. These muffins can be kept without refrigeration for three days, or cling wrapped and keep in the fridge for a week.


Banana Walnut Chocolate Chips Muffins
makes 12

Ingredients

60g butter, melted, cooled
2 cups self raising flour, sifted
1/2 cup caster sugar, slightly less
1/2 cup milk
2 eggs
3 large bananas, mashed or chunks
1/2 cup choc chips
1/2 cup walnuts, coarsely chopped


Method


  • Preheat oven to 200C. Stir flour and sugar in a mixing bowl. Make a well in the centre of dry ingredients.
  • Lightly hand whisk egg, milk and butter in a bowl or jug. Add to dry ingredients, along with the bananas. Using a wooden spoon or spatula, gently mix ingredients until just combined. Do not beat the mixture or the muffins will be TOUGH.
  • Spoon the mixture evenly into the muffin cases. Top with chocolate chips and walnuts. Bake for 20 minutes or until firm on top when lightly touched.


After Job had prayed for his friends, the LORD restored his fortunes and gave him twice as much as he had before. Job 42:10

When was the last time someone asked you to pray for them? Have you ever wondered why people ask you to pray for them?
I believe this is God's way of recognising you as a great person of prayer.
The Lord trusts you enough to send people to you, we need to be faithful to pray for those whom God has sent.


Tuesday 18 November 2014

We All Stumble In Many Ways


American celebrity grill master chef  Bobby Flay 's tips on how to make the prefect burger. 
  •  He recommends handling the meat as little as possible when forming patties. Make a well in the center by pressing your thumb to push a depression into the center. This prevents it from bulging and reduces the need to press down on the burger while it grills.
  • You can use any cut of beef but the fat content must be 20 percent. Anything less than that and it'll be too dry.
  • You only need to add salt and pepper on both sides of the patty. You don't need any 'secret ingredients' inside the burger itself.
  • Brush a little oil on the patty and don't ever push down the burger. Let a crust form, and then flip it.
That's it! That's all you need for a classic Bobby Flay's basic burger. We all know Bobby Flay is big on flavour, his recipes are usually with a long list of ingredients. I'm not totally sold. To be honest, I bought my mince from a gourmet butcher, making sure they're of top quality and with at least 20% fats. I want my burger to be moist, juicy and beefy.


My beef patty with a thumb depression. Seasoned with salt and crushed black pepper.


Lightly brush with olive oil, cook on hot grill. I do not need to press the patty down. They're evenly browned with a crust.


Prepare the chipotle ketchup ahead. I got this salsa chipotle instead of chipotle in adobo sauce.


Cook white button mushrooms with thyme and parsley for topping. This can be done ahead.


Wild Mushroom Cheddar Burger
Adapted from Foodnetwork
serve 4( serve one in red)

2 tablespoons olive oil
1 tablespoon unsalted butter
12 ounces assorted mushrooms 250g white button mushrooms
1 small shallot, finely diced
kosher salt and freshly ground black pepper
1 tablespoon chopped fresh thyme leaves
2 tablespoons chopped fresh flat-leaf parsley
1 1/2 pounds ground chuck (80% lean)or ground turkey (90% lean) 150g beef
1 1/2 tablespoons canola oil to brush
4 slices sharp cheddar cheese one slice
4 hamburger buns, split, toasted one hamburger bun

Chipotle Ketchup(optional)
1 cup ketchup 2 tablespoons
2 to 3 pureed canned chipotle in adobo 2 tsp Chipotle salsa
1/4 tsp kosher salt
1/4 freshly ground black pepper


  • Whisk together the ketchup, chipotle, salt, and pepper in a small bowl. Cover and refrigerate for at least 30 minutes to allow the flavour to meld. The sauce will keep for 1 week in a tightly sealed container in the refrigerator.


Method


  • Heat the olive oil and butter in a large saute pan over high heat until almost smoking. Add the mushrooms and cook, stirring occasionally, until soft, about 5 minutes. Add the shallot, season with salt and pepper, and cook until the mushrooms are golden brown, about 5 minutes. Stir in the thyme and parsley and transfer to a bowl.
  • Divide the meat into 4 equal portions (about 6 ounces each). Form each portion loosely into a 3/4 inch thick burger and make a deep depression in the center with your thumb. Season both sides of each burger with salt and pepper.
  • Cook the burgers, using the canola oil and topping each one with a slice of cheese and a basting cover during the last minute of cooking.
  • Place the burgers on the bun bottoms and top each burger with chipotle ketchup(top only), if using, and a large spoonful of the mushrooms. Cover wit the bun tops and serve immediately.


I made this burger for my younger son who has just booked out from camp. I pinched some of the beef and mushrooms while he was eating. Wow! moist, juicy and tender beef, and don't leave out the chipotle sauce. It's good!


This post is linked to 'Cook Like Bobby Flay' event hosted by Yen from Eat Your Heart Out, 
Zoe from Bake for Happy Kids and Grace of Life Can be Simple.


How well do your actions mirror the faith that you proclaim? This is a question that we all struggle to answer well.

We all stumble in many ways. Anyone who is never at fault in what they say is perfect, able to keep their whole body in check. James 3:2

Friday 14 November 2014

Therefore Welcome One Another


(Sound of knocking on door) (Spoken) Come in, well, well, well, look who's here. I haven't seen you in many years.
If I knew you were coming, I'd 've baked a cake, baked a cake, baked a cake. A 50s song by Eileen Barton.


What cake would I be baking? It would be these Apricot Almond Squares. They're just perfect for you.  Delicious looking cakes with apricot and almond flakes. Don't they look like the sun peeking through the clouds? Buttery and crumbly moist and soft, I would served them warm with a cup of tea.

Now, if you have guests coming and want to bake a cake,  won't you bake these apricot almond squares too? Here's the recipe


Apricot Tray Bakes
adapted from happyhomebaking
makes nine 6cm squares, 6 inch square pan


Ingredients

100g unsalted butter, softened at room temperature
30g caster sugar
2 egg yolks
1 tsp vanilla extract

2 egg whites
60g caster sugar

80g cake flour
40g+30g ground almond
9 apricot halves, canned apricots
almond flakes


Method


  • Wash the canned apricots to remove the syrup,drain,pat dry with paper towel and set aside.
  • Place butter in a mixing bowl,beat with a wooden spoon or a balloon whisk till smooth. Add the sugar and continue to beat until the mixture turns pale, light and fluffy.
  • Gradually add in the egg yolks( a teaspoon at a time), whisking after each addition.
  • Add in the vanilla extract, whisk to continue. Set aside.
  • In a clean, dry mixing bowl, beat egg whites with a handheld electric mixer on low speed until mixture becomes frothy and foamy.Add half of the sugar and turn to high speed and beat until egg whites reaches the soft peak stage. The soft peak stage is reached the peaks of the whites curl over and droop slightly. The egg whites should appear smooth and glossy.
  • Add the beaten egg whites into the butter and egg yolk batter in 2 separate additions, each time folding gently with a spatula until just blended.
  • Sieve over the flour and 40g of ground almond. Fold with the spatula until just combined. Spoon half of the batter into a 18cm square pan (lined with parchment paper). Spread and smooth out the batter evenly. Arrange the apricots, cut side down.
  • Add 30g of ground almond into the remaining batter. Fold with a spatula until combined. Place batter into a piping bag. Snip off the tip of the piping bag and pipe the batter horizontally and vertically along the edges of the pan and in between the apricots. Sprinkle almond flakes on the surface of the piped batter.
  • Bake in preheated oven at 180C for about 30-35 mins or until the surface turns golden and a toothpick inserted into the centre comes out clean. 
  • Remove from oven, leave to cool for about 5 minutes. Unmould and transfer to wire rack, leave to cool completely.


Note: I beat egg white first, then using the same whisk, beat the butter and sugar in another bowl.
          I divide the batter into 3/4 for spreading and 1/4 for piping. To make 20 slices, I bake in 9 inch
          square pan using one and half of the ingredients.


Church Open House

A way to introduce the church to the community and establish bridges to people around the church.


Therefore welcome one another as Christ has welcomed you, for the glory of God. Romans 15:7

Monday 3 November 2014

God called the light Day


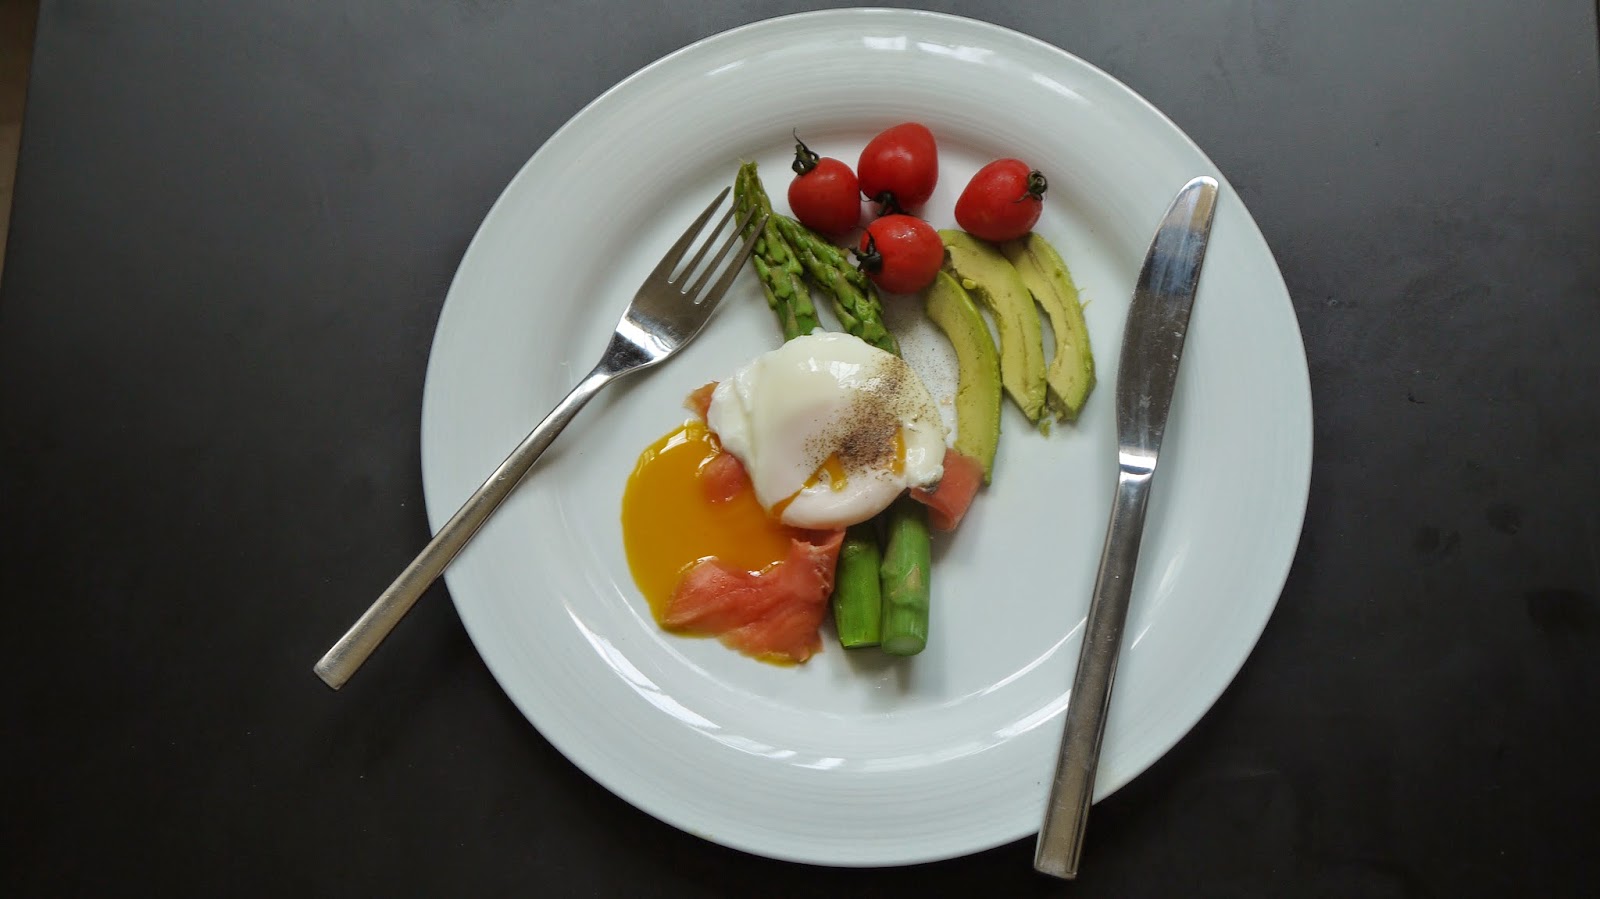
Poaching eggs is so fuss free and neat. If you have mastered the know how, you would be like me, have poached eggs for every breakfast.


For this breakfast idea, blanched asparagus for a few seconds in boiling water, remove and soak in cold water to cool. Add sweet cherry tomatoes, sliced avocados and store bought smoked salmon slices. Place poached egg, and black pepper to serve. Healthy gourmet looking breakfast done in 10 minutes.

Jamie Oliver has put up a Perfect Poached Eggs video and I like his lively presentation, clear and easy instructions. In the video, he shows three ways of poaching eggs. My poached egg is done using the first method.


Healthy breakfast goes with a healthy shake. This has two avocados flesh, a spoonful of Milo powder, a spoonful of gula melaka crumbs and a cup of low fat milk.


And God called the light Day, and the darkness he called Night. And the evening and the morning were the first day. Genesis 1:5

Tuesday 21 October 2014

Be Patient


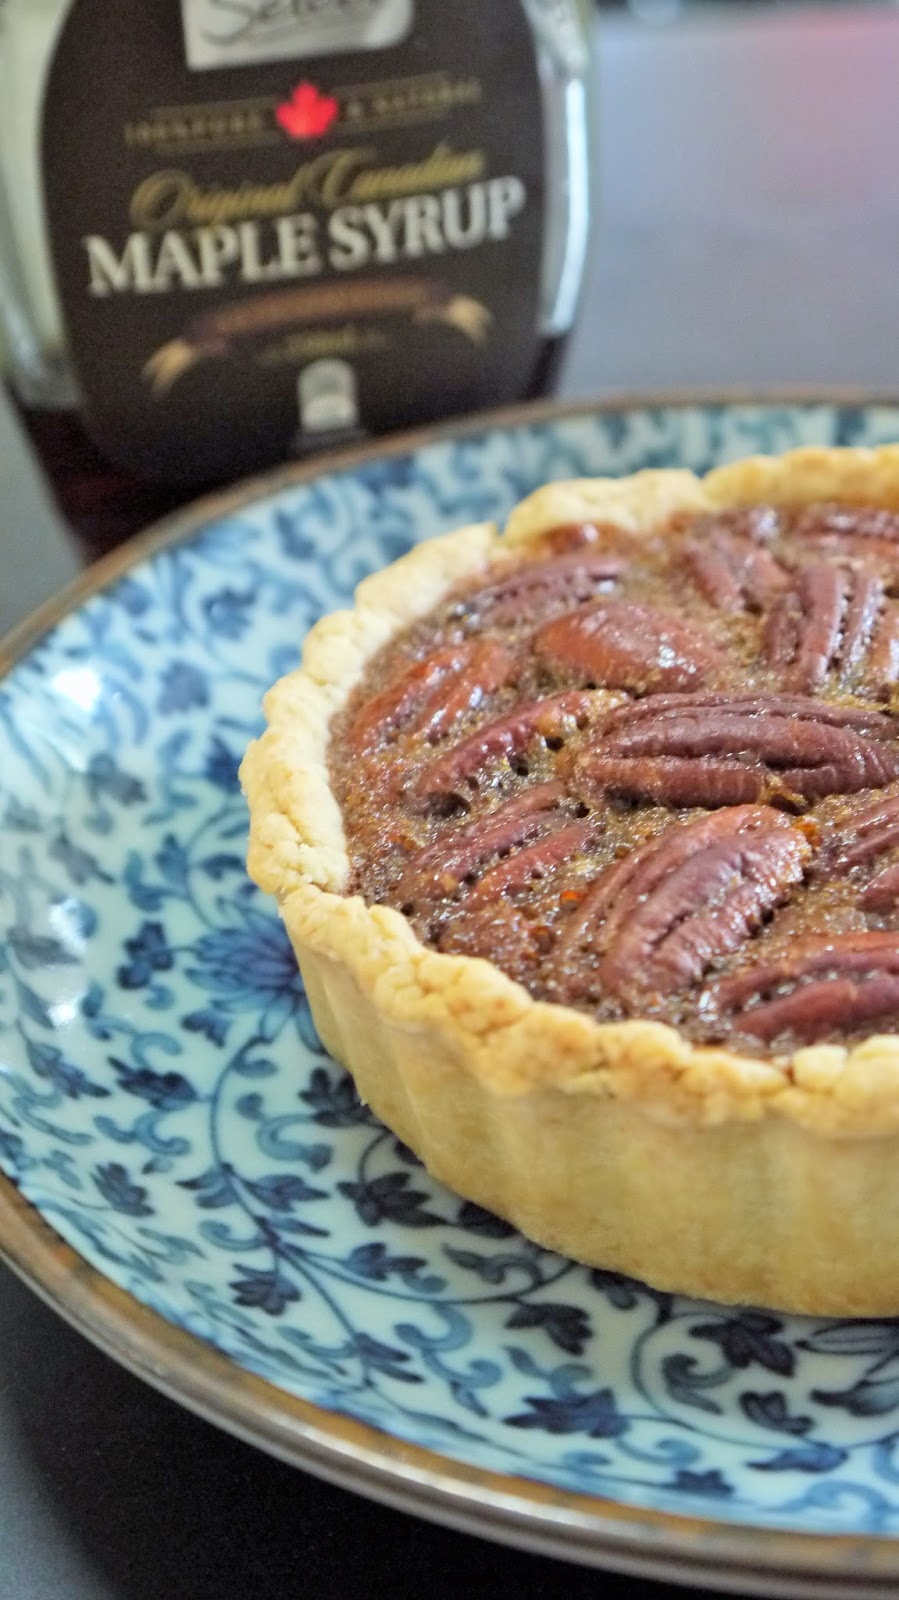
Everyday we learn new things. Nothing is frivolous. Today I learn something about maple syrup and the differences between pies and tarts. I learn maple syrup is graded according to the Canada, United States, or Vermont scales based on its density and translucency.

I have always buy pure maple syrup for pancakes but have never known its grading and colour. There are also not much choices to buy here. The most popular brand is Macdonald's maple syrup which is labelled as 100% Pure Grade A, dark amber. Pure maple syrup is not cheap and once you have tried pure maple syrup on waffles and pancakes, you will never go for the flavoured ones.

The maple syrup which I am using for this Maple Nut Pie was bought from Australia. I was looking for its grade but couldn't find any. It is simply labelled as original Canadian maple syrup. I suspect the syrup is adulterated with corn syrup though it is very dark with a rich maple flavour. This is a typical Grade B which is used primarily for cooking and baking.


Is there a difference between a pie and a tart? Yes, there is. They are like close cousins with distinct differences.
 A pie is a sweet or savory dish with a crust and a filling. According to thekitchn.com, the sides of a pie dish or pan are sloped. It can have just a bottom, a top or both a bottom and a top crust. Pies are served straight from the dish in which were baked.

A tart is a sweet or savory dish with shallow sides and only a bottom rust. Tart crusts are usually made from pastry dough traditionally flour, unsalted butter, cold water, and sometimes sugar. Tarts are baked in a pan with a removable bottom, or in pastry ring on top of a baking sheet so that it be unmolded before serving.

Well, my Maple Nut Pie obviously has the tart look. I used a removable base tart tin, and I hope it is acceptable in Bake Along. I do not have a pie dish but I followed the recipe closely. I adapted the recipe from Lena of Frozen Wing, I thought her Maple Nut Pie looks fantastic. I just love her rustic looking pie.


Maple Nut Pie
Williams Sonoma Baking Book
half of the original recipe, makes two 12cm pie

Pastry Dough

Ingredients

200gm plain flour
1/2 tbsp sugar
1/8 tsp salt
63 cold butter, cut into cubes
3 tbsp ice water

Method


  • In the bowl of a food processor, combine flour, sugar, salt and pulse to blend. Add the butter and pulse 5-6 times until the mixture of texture of coarse meal with butter pieces are larger than small peas.
  • Add 3 tbsps of water, pulsing once after each addition and adding just enough to make crumbly dough, it will not hold together on its own but when gathered into ball with your hands. Add more water if necessary, 1 tbsp at at time.( I mixed the dough by hand)
  • Transfer the dough onto a floured work surface, roll into a ball and flatten into a disk with a few gentle taps of the rolling pin. Lift the dough and give it a quarter turn and roll out. Continue to turn and roll out to a wider circumference than your pan. 
  • Transfer the dough to the pie dish or tin, trim the edge of the dough round, leaving about 2 cm overhang. Fold the overhang under itself and pinch it together to create a high edge decoratively and freeze the pie shell until firm, about 30 minutes. 
  • Lay a foil paper and put in some pie weights or raw rice and partially bake the pie shell on a preheated oven at 190C for about 20 minutes. Remove the beans and further bake for another 10 minutes until the shell is pale gold.
  • Remove from oven. While the shell is baking, can proceed to make the filling.

Filling (for one 12cm tart tin)
1 cup maple syrup (half cup)
1 large egg, lightly beaten (1 small egg)
2 tbsp brown sugar
pinch of salt
1 tsp unsalted butter,melted
1/2 tsp vanilla extract
90gm pecans, coarsely chopped ( top pie with nuts, 50gms)

Method

  • In a saucepan, over medium heat, bring the maple syrup to a boil and boil for about 4-5 minutes to reduce by about one fourth. Remove from heat and pour into a heatproof bowl or measuring pitcher. The syrup should reduced to about 3/4 cup(1/4) or a little less. If necessary, return to boil until the syrup is sufficiently reduced. Let cool down for a while before proceeding.
  • In a bowl, stir together the eggs, sugar, reduced maple syrup, salt, melted butter and vanilla until well mixed. Add the pecans and stir well. Pour into the partially baked pie shell, making sure the pecans are evenly distributed.(I top the shell with pecans instead). Bake the pie until the center is slightly puffed and firm to touch, about 30 to 40 minutes (25minutes). Remove and let cool on the wiring rack.


This pie should really be eaten with a scoop of vanilla ice cream. It is  perfect accompaniment to pecans and maple syrup.


This post is linked to Bake Along 69 hosted by Joyce, Zoe and Lena.


Be patient, then, brothers and sisters, until the Lord's coming. See how the farmer waits for the land to yield its valuable crop, patiently waiting for the autumn and spring rains.
James 5:7

Tuesday 14 October 2014

God of All Grace


 In 2010, the first series of Junior Masterchef Australia was won by a 12 year old girl from Queensland, Isabella Bliss. This Lemon Meringue Cupcake was Isabella's first mystery box challenge which she completed in 40 minutes. With no recipe in hand, the talented 12 year old completed the challenge using the ingredients in the mystery box. The result was these luscious looking cupcakes which I have been recreating and baking again and again for friends.


There are 3 components in the cupcake which are the cake, the tangy lemon curd and the meringue. The cake is made of thickened cream instead of butter, and it is a breeze to make them though I always take more than the 40 minutes challenge to complete the whole process.


A blowtorch is ideal to brown the meringue but I do not have one. It is a shame that my meringue is unevenly brown with some burnt ends, otherwise these would have made it to the most gorgeous cupcakes I ever made.


Isabella's Lemon Meringue Cupcake
makes 12

Ingredients

250ml pure cream
220g caster sugar
2 eggs, lightly beaten
225g self raising flour
finely grated rind of 1 lemon

Lemon curd
1/2 cup lemon juice
100g butter
110g caster sugar
1 egg
3 egg yolks

Meringue
3 egg whites
110g 1/2 cup caster sugar


Method


  • Preheat oven to 180C. Place 12 patty cake liners in a 12 hole 1/2 cup capacity muffin pan.
  • Place cream, sugar and eggs in a large mixing bowl and whisk until smooth. Gradually add flour and zest and continue whisking until mixture is thick and smooth. Divide mixture between prepared liners and bake for 15-20 minutes or until cakes spring back to touch. Cool in muffin pan.
  • For lemon curd, heat lemon juice and butter in a small saucepan and simmer until butter has melted. Add sugar, egg and yolks and cook, whisking continuously until mixture becomes thick and glossy. Pour into a shallow oven tray to cool.
  • For meringue,beat egg whites in an electric mixer until firm peaks form,gradually add sugar, a tablespoon at a time beating until sugar has dissolved between each addition. Spoon meringue mixture into a piping bag.
  • To serve, preheat grill to medium high. Cut a small hole in the top of each cupcake and fill with 1 -2 teaspoons of lemon curd. Pipe a swirl of meringue mixture on the top of each cupcake and place under heated grill for  60-90 seconds or until golden. Arrange on a serving plate with spoonfuls of lemon curd if desired.
You can also try my favourite lemon curd.

2 eggs, plus 2 egg yolks
165g caster sugar
90g chilled unsalted butter
zest and juice of lemons

Whisk whole eggs, yolks and sugar in a saucepan until smooth, then place pan over a low heat. Add the butter, juice and zest and whisk continuously  until thickened. Strain through a sieve into a sterilised jar. Lemon curd keeps, covered, in the fridge for 2 weeks.

For a more stablised meringue, you can do Italian meringue.

186g sugar
84g water
3 egg whites, 90gm

Combine sugar and water in a small pot over medium high heat. Without stirring, bring the syrup to a boil and let it cook gently until the temperature reaches 115C(soft ball). Meanwhile begin to whisk the egg whites while the sugar syrup is bubbling. Whisk egg whites to stiff peak, gradually pour the syrup in a small stream into the egg whites. Continue whisking until the mixing bowl is cooled to touch.


And the God of all grace, who called you to his eternal glory in Christ, after you have suffered a little while, will himself restore you and make you strong, firm and steadfast.1 Peter 5:10

Thursday 9 October 2014

By The Will of God


I know my kabocha cookies are quite hideous looking but hey they're supposed to be Halloween bakes. I don't celebrate Halloween but Halloween bakes are fun things to do. I have done muddy fingers and spider cupcakes( they're not in the blog) and children love them.


These are simple soft cookies suitable for toddlers to nibble too. I like that it has no butter and very little sugar.

Kabocha also known as Japanese pumpkin is naturally sweet. It has an abundance of beta carotene, vitamin A, B and C, iron, potassium, calcium and folic acid. Kabocha skin is edible too.


Kobocha cookies for Halloween
adapted from cookpad


Ingredients

40g pumpkin flesh
20g sugar
20g vegetable oil
50g cake flour


Method


  • Microwave pumpkin and remove skin.
  • Preheat oven to 170C. Mash the pumpkin and add sugar and oil.
  • Add in flour and mix pumpkin mixture into a dough.
  • Shape pumpkin into ovals and lightly press them down.
  • Cut pumpkin skin into small triangles and stick them to the heads.
  • Make eyes and smile on the face.( I used chopstick and toothpick).
  • Bake in oven for 15 minutes.


This post is linked to LTU 'Pumpkin' hosted by Eileen from Eileen's Diary
Organized by Zoe from Bake for Happy Kids and Doreen from My little favourite DIY.


Paul, an apostle of Jesus Christ by the will of God. 2 Corinthians 1:1

Paul was an apostle by the will of God. He serves by the will of God.
We serve by the will of God, and He is pleased when we do this.

Monday 29 September 2014

LORD, are our Father


I visited the  Epicurean Market at Marina Bay Sands three weeks ago. It was a three-day food extravaganza which served a multitude of events, meals and classes showcasing celebrity chefs, exclusive ingredients and wines.

Among the highlights are freshly cooked specialities and take home products. I bought food from celebrity restaurants like Cut by Wolfgang Puck, and also hams, cheese and sausages from the exhibitors to cook at home.


The pork sausages bought from the Epicurean Market are so delicious. Fresh, lean and meaty, and they are much cheaper than retail outlets. I cooked one in skewers with apples, onions and red peppers.


These skewered sausages are grilled skinless and they are really yummy with smokiness taste. The sauce is simply Dijon mustard and honey, and sides is buttered rice.


Pork Sausages and Apple Skewer
Recipe source: Own
serves 1


Ingredients
1 pork sausage, casing removed
1 red pepper, cut into 1"chunks
1 red onion, cut into 1" chunks
1 Granny Smith apples, chunked, dip in lemon juice + water
3 wooden skewers, soak in cold water for at least half an hour.
Olive oil for brushing

Sauce
2 tablespoons Dijon mustard
1 tablespoon honey

Method


  • Remove casings from the sausage and slice thickly, about 1/2" to an 3/4" thick. Prepare the red pepper, onion and apples. 

  • Alternatively thread apple,red pepper,onion and one sausage slice. Brush with olive oil
  • Grill on hot pan until sausage is cooked, browned and vegetables slightly charred.


This post is linked to Little Thumbs Up 'APPLE' hosted by Kit from I- lost in Austen, organised by
Zoe from Bake for Happy Kids and Doreen from My little favourite DIY.


Yet you, LORD, are our  Father. We are the clay, you are the potter; we are all the work of your hand. Isaiah 64:8

Wednesday 24 September 2014

We Also Glory In Our Sufferings


This is another wonderful and easy dish to make. Scallops with  Apple Pan Sauce can be served as a starter or as an accompanying dish to risotto, couscous and vegetables.

I was a little disappointed with the apple sauce when I tasted it after cooking. It wasn't that great, a little sourish but over the scallops, it was delicious. The pea shoots works well too as an accent to the dish. Overall, this dish is great to serve for a dinner party which you can prepare the sauce in advance. The scallops just take a minute to sear on each side. Fast, Fresh and Simple.


Scallops with  Apple Pan Sauce
servings 4
Bon Apppetit

Ingredients

2 Granny Smith apples
2 tbsp fresh lemon juice
2 tbsp olive oil
12 large sea scallops, side muscle removed (frozen)
kosher salt, freshly ground pepper
1 tbsp unsalted butter
1/4 cup hearty sprouts


Method


  • Core 1 apple, cut into 1 inchcubes. Place in a blender with lemon juice and 1/4 cup water;puree until smooth. 

  • Strain juice through a fine mesh sieve into a small bowl. Peel, core, and cut remaining apple into 1/4 in cubes. Add to bowl. Set aside.
  • Heat oil in a large skillet over medium-high heat. Season scallops with salt and pepper. Working in batches, cook scallops until golden brown and just cooked through, about 2 minutes per side. Transfer to a plate;tent with foil to keep warm.

  • Add butter to skillet. Cook, scraping up browned bits from bottom of pan. Add reserved apple mixture and cook, stirring often, until juice is thickened and apple pieces are tender, about 4 minutes. 
  • (Drain) and spoon over scallops;top with sprouts and season with salt and pepper. 


This post is linked to Little Thumbs Up 'APPLE' hosted by Kit from I-lost in Austen, organised by
Zoe from Bake for Happy kids and Doreen from My little favourite DIY.


God can bring blessings through those who know that life's goal is character, not comfort but hope.

Not only so, but we also glory in our sufferings,because we know that suffering produces perseverance; perseverance, character; and character, hope. And hope does not put us to shame, because God's love has been poured out into our  hearts through the Holy Spirit, who has been given to us. Romans 5:3-5
Related Posts Plugin for WordPress, Blogger...